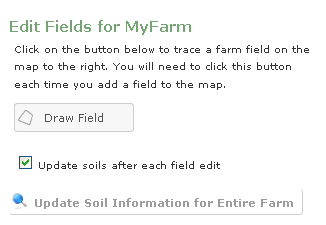
When drawing the fields for your farm site, it is recommended that you draw the farm site as individual crop management units (fields). When each field is completed, you will be given an option to name and describe the field properties in the "Field Information" window. Once that information is provided, select the Save tab. This command will automatically calculate the acreage of the field. Do not concern yourself with areas of the field that will need to be removed such as ponds, wells, sinkholes and forest, these features will be removed in the next process.
Soils information will be retrieved for each field that is drawn. This can be done at the time of drawing the field or it can be delayed until after the farm site is completed. By default, the box is checked in-front of "Update soils after each field edit". If you un-check this box, the processing time during digitizing will speed-up. You can always retrieve the soils information after all your fields are completed.
Once you select the ![]() tab,
your cursor turns into a drawing tool, and you will be able to begin to
draw a boundary around your fields. You can subdivide your
farm site with as many crop management units (fields) as you like. Choose
a field where you would like to begin mapping your farm, place the
cursor at your starting point (notice your cursor has changed to a plus
sign) and begin drawing by left clicking with the mouse. With each left
click of the mouse you will place a vertex ( a point that will lock the
line in place) on the photo. Drag your mouse along the edge of the
field and left click again. This will place another vertex which
will allow you to move the line in a different direction so you can continue
to trace the boundary of the field.
tab,
your cursor turns into a drawing tool, and you will be able to begin to
draw a boundary around your fields. You can subdivide your
farm site with as many crop management units (fields) as you like. Choose
a field where you would like to begin mapping your farm, place the
cursor at your starting point (notice your cursor has changed to a plus
sign) and begin drawing by left clicking with the mouse. With each left
click of the mouse you will place a vertex ( a point that will lock the
line in place) on the photo. Drag your mouse along the edge of the
field and left click again. This will place another vertex which
will allow you to move the line in a different direction so you can continue
to trace the boundary of the field.
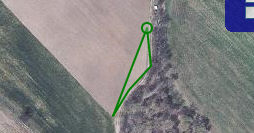
Continue this process until all edges of the field are enclosed; then double left click to finish.

When you double click to finish your first field the field boundary will turn yellow and a “Field Information” box will open up.